Do you ever feel like you’re in a constant state of content chaos? The feeling is familiar to every creator: you have to post, but you have no idea what to say. You spend hours scrambling to come up with an idea, create the content, and get it out on time. The result is a cycle of stress and burnout that can completely stall your growth.
The truth is, consistent content creation isn’t about working harder; it’s about working smarter. The most successful creators have a simple, repeatable content creation plan that takes the guesswork out of the process. A plan is your antidote to stress. It allows you to take a messy, overwhelming process and turn it into a clear, manageable system.
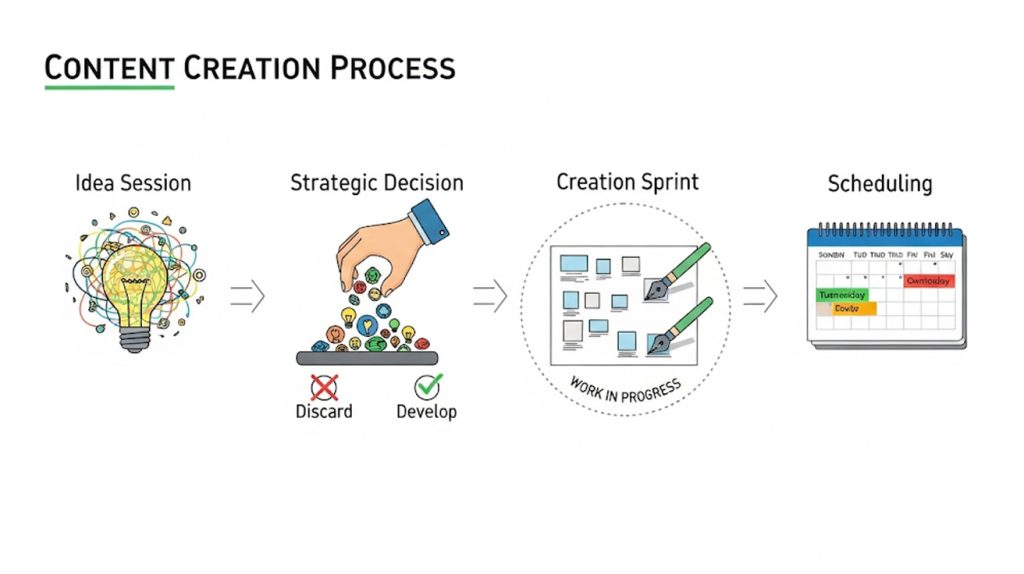
In this guide, we’ll walk you through a powerful 4-step content creation plan that will help you brainstorm, create, and schedule all your content for the week in just a few focused hours. Ready to stop the content chaos and start creating with purpose? Let’s dive in.
Step 1: The Idea Session
The first step in any successful content plan is to separate idea generation from creation. So many creators get stuck because they try to brainstorm, write, and design all at once. This first step is your dedicated idea session. Your goal is to spend one to two focused hours doing nothing but coming up with as many content ideas as you can.
By dedicating a specific chunk of time to just brainstorming, you free your mind from the pressure of having to create a polished final product. This allows your creativity to flow without interruption. Think of this session as a “brain dump”—get every single thought, question, and idea out of your head and onto a document.
How to Have a Productive Idea Session
- Use Your “Idea Bank”: Go back to your notes app or spreadsheet where you’ve been capturing ideas as they come to you. This is your starting point. You’ll already have a handful of ideas to work with, so you’re never starting from a blank page.
- Review Your Analytics: Look at your top-performing content from the last month. What topics did your audience love? What questions did they ask in the comments? Your analytics are a goldmine of ideas you already know will resonate.
- Set a Timer: Give yourself a specific amount of time, say 60 minutes, and challenge yourself to come up with as many ideas as possible. Don’t edit yourself. Just write. The goal is quantity over quality at this stage. You can refine the ideas later.
This dedicated idea session is the simple act that will prevent you from ever having creative block again. It’s the foundation of a proactive, rather than reactive, content strategy.
Step 2: The Strategic Decision
Now that you have a long list of ideas, the next step is to make a strategic decision. This is where you transform your raw ideas into a cohesive, balanced content plan. In this step, you’re not creating the content yet; you’re simply deciding what type of content each idea will be. This is a crucial step that ensures your feed is dynamic and engaging, rather than just a stream of the same old format.
For each idea on your list, ask yourself: “What is the best format to deliver this message?”
- The Educational Carousel: If your idea is about a step-by-step process or a list of tips, a multi-image carousel post is the perfect format. It allows you to break down complex information into digestible chunks that are highly savable and shareable.
- The Relatable Reel: If your idea is about a common struggle or a funny, relatable experience, a short-form video like a Reel or TikTok is the way to go. This is a great way to show your personality and build a deeper connection with your audience.
- The Thought-Provoking Post: If your idea is about a big industry trend or a controversial opinion, a long-form caption on a single image is a great choice. It encourages conversation and helps you establish your authority as a thought leader.
- The Engaging Story: If your idea is a simple question or a quick poll, use an Instagram Story. This is a great way to interact with your audience in real time and get direct feedback that can be used for future content.
By matching each idea to the right format, you’re not just creating content; you’re building a strategic, well-rounded content mix that will keep your audience engaged and excited for your next post.
Step 3: The Creation Sprint
Now that you have your ideas and you’ve strategically matched them to the right content formats, it’s time for the creation sprint. This is where you transform your plans into reality. The key to this step is to batch your work. Instead of creating one post from start to finish, you’ll create all of your week’s content in one focused, uninterrupted session.
Think of it like an assembly line. When you’re in “writing mode,” you’re just writing all your captions and scripts for the week. When you’re in “design mode,” you’re just designing all your graphics and editing all your videos. This is the most efficient way to work because it prevents you from constantly switching between different tasks.
How to Have a Productive Creation Sprint
- Minimize Distractions: Your creation sprint should be a session of “deep work.” Turn off your notifications, close unnecessary tabs, and put your phone on do not disturb. The fewer distractions you have, the more you can focus on creating high-quality content.
- Focus on Quality and Intention: Don’t just rush through this step. Remember that every piece of content you create has a purpose. Ask yourself, “What value does this post provide?” or “How does this post connect with my audience?” Focusing on intention will help you create content that is meaningful and not just “filler.”
- Use Templates: Templates are your best friend in a creation sprint. Create templates for your carousel posts, Reels, and Instagram Stories. This will save you an incredible amount of time because you won’t have to start from scratch every time you create a new post.
By batching your creation, you’re not just working harder; you’re working smarter. This single habit will save you hours each week and allow you to produce a consistent stream of high-quality content without the stress.
Step 4: The Scheduling Process
You’ve had your idea session, made your strategic decisions, and completed your creation sprint. The final step in your content plan is to schedule everything.
This is where you put your content on autopilot and free up your time for other tasks. Scheduling is the final key to consistency and a stress-free content process.
The problem with creating content and then manually posting it is that life gets in the way. A last-minute meeting, an unexpected errand, or a simple lapse of memory can lead to missed posts and a broken content routine. By scheduling your content in advance, you ensure that your posts go out on time, every time, without you having to be online.
How to Schedule Your Content Effectively
- Use the Right Tools: Most social media platforms have a native scheduler built in. You can schedule posts directly on Instagram, Facebook, and TikTok. There are also powerful third-party tools like Later and Planoly that allow you to plan, schedule, and analyze your content all in one place.
- Double-Check Everything: Before you hit schedule, do a final review. Check your captions for typos, make sure your visuals are high-quality, and ensure your links are working. A quick final review can prevent simple mistakes that can undermine all your hard work.
- Schedule in a Single Session: Just like your creation sprint, you should batch your scheduling. Set aside 30 minutes to an hour to schedule all your content for the week. This is far more efficient than trying to schedule a single post every day.
By scheduling your content, you’re not just posting; you’re building a system that works for you even when you’re busy. This final step is what turns a good plan into a great one and gives you the freedom to focus on other parts of your business or enjoy your time off.
Conclusion: The Habit of Consistency
You’ve just learned a powerful 4-step plan for a more productive content creation process. But remember, this isn’t just about following a checklist; it’s about building a sustainable habit.
The most successful creators aren’t just consistent; they’re intentionally consistent. They have a plan, a process, and a deep understanding of what their audience needs.
By putting this system in place, you’ll stop feeling the panic of a blank page and start looking at content creation as a clear, manageable system.
Here’s a quick recap of your new content workflow:
- Step 1: The Idea Session: Dedicate 1-2 hours to just brainstorming and gathering ideas.
- Step 2: The Strategic Decision: Choose the best content format for each idea.
- Step 3: The Creation Sprint: Batch-create all your content in one focused session.
- Step 4: The Scheduling Process: Put your content on autopilot by scheduling it in advance.
It’s time to stop the last-minute scramble and start creating with purpose. Which of these steps will you implement in your workflow today?